I was playing with Azure IAAS & than came the requirement to have multiple NICs on a machine and to my surprise
- There is no way to have multiple NICs after the machine has already been setup with a single NIC.
- Multiple NICs are not supported by all VM sizes. (refer below link to know about which size can support multiple NIC)
https://docs.microsoft.com/en-us/azure/virtual-machines/sizes
- GUI has no way to create multiple NIC, it needs to be done via Powershell, Template , CLI.
Microsoft should add these capabilities as there can be situations where you want to add multiple NICs & you started with single NIC VM. There should also be an option in GUI to do the same but till MS add these features lets enjoy powershell 🙂
First & foremost note down the VM size that you will be using & it should support multiple NICs.
Login to AZURE resource manage portal using Login-AzureRmAccount
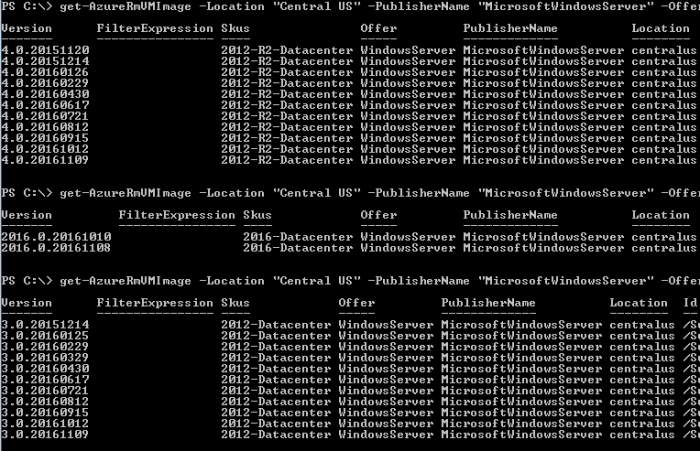
Lets first select the image that we want to deploy & filter it with powershell.
2016:
get-AzureRmVMImage -Location “Central US” -PublisherName “MicrosoftWindowsServer” -Offer “WindowsServer” -Skus “2016-Datacenter”
2012 R2:
get-AzureRmVMImage -Location “Central US” -PublisherName “MicrosoftWindowsServer” -Offer “WindowsServer” -Skus “2012-R2-Datacenter”
2012:
get-AzureRmVMImage -Location “Central US” -PublisherName “MicrosoftWindowsServer” -Offer “WindowsServer” -Skus “2012-Datacenter”
Following information is required:
$rsgname = “STP-LAB-RES-GRP” # resource group Name
$netrsgname = “STP-LAB-NET-RES-GRP” #network resource name if its different
$stgrsgname = “STP-LAB-STG-ACC” #Storage resource name if its different
$location = “Central US” # Location Name
$stgaccname = “stplrsstg” # storage account
$vnetname = “GlobalNetwork” # Vnet
$subnet1 = “STP-Net-Range1” #subnet1
$subnet2 = “STP-Net-Range2” #subnet2
$nsg = “STP-LAB-NSG-GEN” #network security group
$cred = Get-Credential #administrator userid & password
$size = “Standard_A2_V2” #VM Size
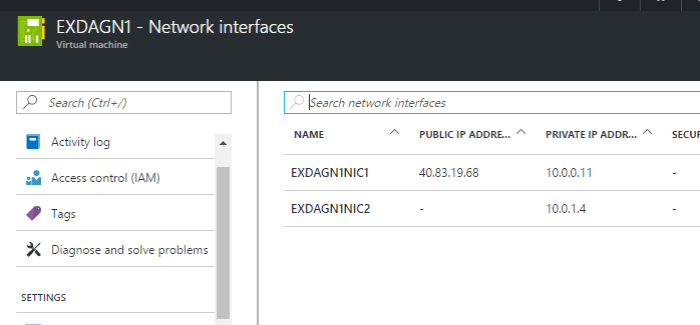
$vmname = “EXDAGN1” #VM name

Now enter the following command to start the config process.
$vm = New-AzureRmVMConfig -VMName $vmname -VMSize $size
$vm = Set-AzureRmVMOperatingSystem -VM $vm -Windows -ComputerName $vmname -Credential $cred -ProvisionVMAgent -EnableAutoUpdate
ADD image that you want to deploy to the configuration.
$vm = Set-AzureRmVMSourceImage -VM $vm -PublisherName MicrosoftWindowsServer -Offer WindowsServer -Skus 2016-Datacenter -Version “latest”
Crete multiple NICs & piblic ip to be added tp configuation:
$vnet = Get-AzureRmVirtualNetwork -Name $vnetname -ResourceGroupName $netrsgname
$pubip = New-AzureRmPublicIpAddress -Name “ExPubIP” -ResourceGroupName $rsgname -Location $location -AllocationMethod Dynamic
$nic1 = New-AzureRmNetworkInterface -Name “EXDAGN1NIC1” -ResourceGroupName $rsgname -Location $location -SubnetId $vnet.Subnets[0].Id -PublicIpAddressId $pubip.Id
$nic2 = New-AzureRmNetworkInterface -Name “EXDAGN1NIC2” -ResourceGroupName $rsgname -Location $location -SubnetId $vnet.Subnets[2].Id
# $vnet.Subnets[0].Id/$vnet.Subnets[2].Id are the subnets that I want to be the NICs to be in.
$vm = Add-AzureRmVMNetworkInterface -VM $vm -Id $nic1.Id
$vm = Add-AzureRmVMNetworkInterface -VM $vm -Id $nic2.Id
Now make one interface as primary(this is mandatory)
$vm.NetworkProfile.NetworkInterfaces.Item(0).Primary = $true
Now we have VM details, Image, Network & now we need storage 🙂
$storageAcc = Get-AzureRMStorageAccount -Name $stgaccname -ResourceGroupName $stgrsgname
$osDiskUri = $storageAcc.PrimaryEndpoints.Blob.ToString() + “vhds/WindowsVM2016EXosDisk.vhd”
$vm = Set-AzureRmVMOSDisk -VM $vm -Name “WindowsVM2016EXosDisk” -VhdUri $osDiskUri -CreateOption fromImage
You can now see whats its in $vm variable just to check & Lets now create the VM using this configuration.

New-AzureRmVM -ResourceGroupName $rsgname -Location $location -VM $vm
Now your VM is being Created & you can login to AZURE portal & verify the specs after process is completed.


Thanks for reading
Tech Wizard

Hi Vikas,
Thanks for this informative article. I was also wondering why Microsoft has not provided us GUI to add NIC. Your article helps me a lot to overcome this issue.
Thanks,
Pankaj Mandal