PowerApps Azure AD connector is not like any other connector, it needs Global Administrator rights to register itself and also require different method (that will go thru in this post) to provide permission to particular users to be able to use this connector in PowerApps and PowerAutomate.
To use this connector, following permissions are required.
- Group.ReadWrite.All
- User.ReadWrite.All
- Directory.ReadWrite.All
When you will search on web you will find few articles but there is important thing which is missing in these, which I struggled as well for one of the customer is –> finding the oauth grant.
All the posts use cntrl + F (Find) instead of just filtering and finding the particular grant only.
Lets walk thru the process again and this time lets just find the particular grant we are interested in and not try to find it using cntrl find or by using @odata:nextLink property.
Log on to flow.microsoft.com as Global Administrator.
Navigate to Data –> Connections

Click –> New connection, Select Azure AD connector (this step is not required if this is already enabled in your organization, if you do not know then just skip this step and try to find the appid as shown in the next step if you do not find anything then it is not registered in your environment and you can follow this step.)
Do Not Select Consent on-behalf of your organization as everyone will get the rights which you do not want.
Just click Accept and you will find the APP under AZURE AD (Enterprise applications)
Log in to portal.azure.com —> Azure Active Directory –> Enterprise applications and find below APPID
APP ID : 2bed6734-1911-40e6-ac44-00d79d70d2bc

Note down the object ID for the application, for my tenant it is 061933a9-df83-44ca-a646-a3e79d7b301a, it will be different in your tenant.
Also, note down the object ID for the user whom you want to provide the permissions. (In may case I noted it abe3bdb1-f1d0-4e36-95f7-0e37008b808a)
Now you need to find the oath grant for this object id –> This is where my approach differs from articles found on the internet.
launch https://graphexplorer.azurewebsites.net/ from your global admin id.(click login and accept)
Type below keep operation as GET
https://graph.windows.net/myorganization/oauth2PermissionGrants?$filter=clientId eq ‘ObjectID that you noted above’
https://graph.windows.net/myorganization/oauth2PermissionGrants?$filter=clientId eq ‘061933a9-df83-44ca-a646-a3e79d7b301a’
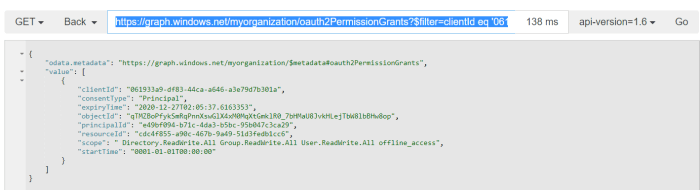
Copy this Grant and update the PrincipalID to the Object ID of the user you previously noted.
{
“clientId”: “061933a9-df83-44ca-a646-a3e79d7b301a”,
“consentType”: “Principal”,
“expiryTime”: “2020-12-27T02:05:37.6163353”,
“objectId”: “qTMZBoPfykSmRqPnnXswGlX4xM0MqXtGmklR0_7bHMaU8JvkHLejTbW8lbBHw8op”,
“principalId”: “abe3bdb1-f1d0-4e36-95f7-0e37008b808a”,
“resourceId”: “cdc4f855-a90c-467b-9a49-51d3fedb1cc6”,
“scope”: ” Directory.ReadWrite.All Group.ReadWrite.All User.ReadWrite.All offline_access”,
“startTime”: “0001-01-01T00:00:00”
}
Change the operation to POST and past the grant that you have updated.
update the address bar to https://graph.windows.net/myorganization/oauth2PermissionGrants and hit Go
Now the user has been granted the required rights which you can check back under application permission in Azure AD.
You can click where is says 2 total users and you will find the user that has been granted the permissions, second user here is global admin as it has been auto granted rights when the app was first registered.

Thanks for reading..
Tech Wizard
